|
Install Instructions
Stabilizer Installation Instructions
read completely before beginning
NOTE: if you do not follow instructions "exactly" as we state, and/or unit(s)
sold are for a specific equipment category (and fuel type), also there is to be absolutely NO intermittent testing of the same unit(s) on various equipment, as this is a permanent install, any deviations outside of that specific category, as well as any modifications/ alterations made to the original equipment shipped from the factory, we will NOT be responsible for any malfunctions,
equipment damage or failures. Our Guarantee/Warranty becomes NULL and VOID and our responsibility and involvement ceases.
1- Take equipment analyses and emissions readings before starting from day "one"...for at least 90 days - pro-rated accordingly
to our guarantee to start your "test" process. This is your Baseline or "before" readings analyses... (NOTE: a longer period may be
necessary if your equipt is old and maintenance has not been done for a long period of time)... Please refer to our baseline format
forms as required for verification purposes of our guarantee (NO exceptions)... Request forms if not given by dealer already.
2- Record initial readings and prepare for installation.
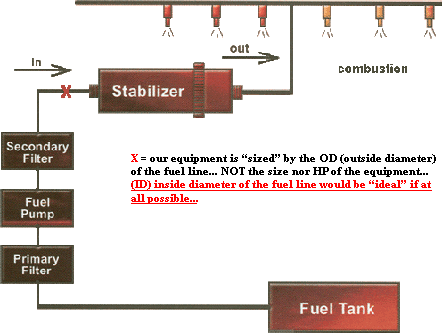
3- Place/Install the fuel stabilizer unit in the main fuel line "after" any/all fuel pumps & (after any/all filters as well) in the "main"
fuel line that is convenient nearest to ignition/combustion. NOT in any return line...
(3a) Do NOT install onto engine/equipment block directly... this will VOID Mfg. Warranty - any other area will not void mfg warranty. Any questions, contact Dr George at HQ directly.
4- - Use hydraulic fittings, secure fuel stabilizer to fuel line ensuring fuel stabilizer is "rattle free"... be aware that the fuel stabilizer has one side marked "IN" (which is "from" the fuel tank/source) and one side marked "OUT" (which is always installed on the fuel line toward the ignition/combustion). It must be installed on the fuel line according to the fuel flow from the fuel tank. Also, the "red arrow" (on our label) is to always be pointed/installed on the fuel line toward the ignition/combustion (outside).
** 5 - "if" you have any electronic or fuel computerized monitoring or analyses system attached to your equipment, you "MUST" disconnect "only" the ground wire/cable to the battery(s)... for 1 minute "AFTER" installing the fuel stabilizer... Then "reconnect" cable... "if" you do not do this, you will get false readings and your equipment will not register or adjust and function accordingly that a "change" has been made !
6- CAUTION....make sure there are "NO" fuel leaks....this can and will be dangerous as well as cause false performance/results problems as well as any pre-existing fuel
conditions...NOT taken care of beforehand...
7- Take analyses and emission readings (if applicable) on equipment for... (the "same" period of time as the baseline days and on a continuous basis not taking off fuel device for any reasons to be as accurate and fair as possible)... "after" installation to complete testing period of days "without/before" and "with/after"
(7a) Please be "patient" with ppm results (black smoke - large
amounts) as this/there is a burn in process from the start
to reduce/eliminate pre-existing conditions, then the ''full''
operation of the device takes place...also may take longer
than 90 days as equipt may be old and has not had
maintenance done for a long time and the burn in/cleaning
process may take a bit longer than 90 days...
8- Record final readings and verify results and performances using our "baseline format forms. (if you need any assistance, pls contact us)..
9 - "Please" take photo's of before - and after installation and send a copy of these + your analyses to Energy Group for our file
and possible use on our website. (We will "not" use clients name if requested to do so...)
Any question after reading this form, and "before" proceeding any further - contact your dealer or Dr George.... PH: 1 - 973 - 942 - 8628 or at info@energy-group.com.
(Note: Individual Results Will Vary).

|